CI/CD with GitHub Actions
CI/CD with GitHub Actions – Project Overview
One of the first things I did when taking over this project from another developer was review the deployment process and overall development workflow. The application already had a Dockerfile and Jenkins pipeline, but I wanted to improve the transparency of deployments and make it much easier for both developers and clients to understand exactly what was being deployed and when. I also implemented Sentry for both server-side and front-end error monitoring so that any production issues could be identified much faster.
Why I Moved from Jenkins to CI/CD with GitHub Actions
Although Jenkins is a perfectly capable CI/CD platform, I decided to migrate the deployment pipeline to GitHub Actions. My reasoning wasn’t because Jenkins was wrong, but because GitHub Actions integrates directly with the repository and provides a much clearer development history.
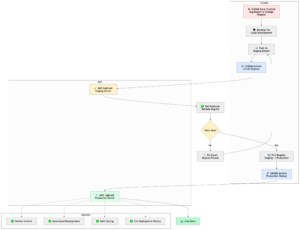
Every commit, deployment, workflow run and pull request is visible in one location. When I push code to the staging branch, GitHub Actions automatically starts the deployment pipeline. I can immediately see which commit triggered the deployment, who made the change, the files that were modified and whether the deployment completed successfully.
Successful deployments appear with a green status, while failed deployments stop immediately and provide detailed logs explaining exactly where the problem occurred. This dramatically reduces debugging time and gives complete visibility over the deployment process.
My Staging and Production Workflow for
CI/CD with GitHub Actions
Rather than deploying directly to the live website, I maintain separate staging and production branches.
Every feature, bug fix or enhancement is pushed to the staging branch first. GitHub Actions automatically deploys that branch to a dedicated AWS Lightsail staging server where I can test the changes exactly as an end user would experience them.
This extra layer is incredibly important because a deployment can technically succeed while still introducing configuration problems. For example, changing an application’s listening port or an environment variable may not cause the deployment itself to fail, but it could still prevent the application from running correctly.
Testing everything in staging first allows me to catch these issues before they ever reach customers. Once I’ve confirmed everything works correctly, I create a pull request from staging into production. After the pull request is merged, GitHub Actions automatically deploys the production branch to the live AWS environment.
GitHub Issue Tracking
Another improvement I introduced was a structured GitHub Issues workflow.
Rather than receiving vague emails saying “the website isn’t working”, I created custom issue templates for bug reports and change requests.
Each bug report asks the client to provide information such as:
- Steps to reproduce the problem
- Expected behaviour
- Actual behaviour
- Website or environment affected
- Severity level
- Due date
- Screenshots or supporting information
This makes troubleshooting far more efficient because I have enough information to consistently reproduce the issue before attempting a fix.
Severity levels also help me prioritise work. Critical authentication or payment issues can be addressed immediately, while cosmetic improvements or lower-priority enhancements can be scheduled for later releases.
CI/CD with GitHub Actions
From Issue to Deployment
Once an issue has been logged, I work through the development lifecycle in a structured way.
I develop the fix locally, push the changes to the staging branch, allow GitHub Actions to deploy automatically, thoroughly test the solution on the staging environment, and only then merge the changes into production.
Because every deployment is linked to commits, pull requests and issue numbers, the entire history of a feature or bug fix is traceable. This provides excellent version control and makes it much easier to understand why changes were made months later.
Separate AWS Environments
The staging and production environments each run on their own dedicated AWS Lightsail instance with separate IP addresses.
Cloudflare DNS directs traffic independently to each environment, allowing the staging site to remain completely isolated from production.
While it is technically possible to host both environments on a single server, I prefer keeping them separate. If the staging environment experiences configuration issues, resource exhaustion or application failures, the production website remains completely unaffected.
This also provides greater flexibility when upgrading infrastructure. Lightsail instances have fixed CPU and memory allocations, so maintaining separate environments makes it much easier to scale or modify one environment without risking the other.
Final Thoughts
For me, the biggest advantage of this workflow is transparency. GitHub Issues, commits, pull requests and GitHub Actions all work together to create a complete audit trail of every change made to the application. Combined with separate staging and production environments on AWS, this provides a much safer deployment process, reduces the likelihood of downtime and makes diagnosing problems significantly easier. While Jenkins remains a strong CI/CD platform, GitHub Actions better suited the way I wanted to manage this project because everything is integrated directly into the repository and every deployment can be traced from the original issue right through to production. If you’re not using CI/CD with GitHub Actions, in your pipeline what are you using instead?